Wiring a bathroom exhaust fan in Cedar Park isn’t rocket science, but you do need to check circuit capacity, switch wiring, and make sure you’re venting to the outside. You’ll sidestep shocks, code headaches, and bad airflow by hiring a licensed electrician to size circuits, add GFCI protection if needed, and route the fan vents right. Here’s a practical walk-through, common snags, and tips for picking the right fan so your bathroom stays dry and safe.
If you’re a DIYer, you’ll get a feel for when to call a pro and what to ask. Magnify Electric’s licensed electricians cover Cedar Park and the Central Texas area, handling everything from simple swaps to electrical upgrades, smart home setups, EV outlets, outdoor lighting, panel fixes, and emergencies. You’ll find guidance on wiring, energy-saving options, troubleshooting, and maintenance so your fan works quietly and actually lasts.
Understanding Bathroom Exhaust Fan Wiring In Cedar Park
Have a plan before wiring your bathroom exhaust fan. You want safe operation and to meet local codes. Here’s what you need to know about wiring basics, common setups, and Cedar Park code.
Overview of Exhaust Fan Wiring
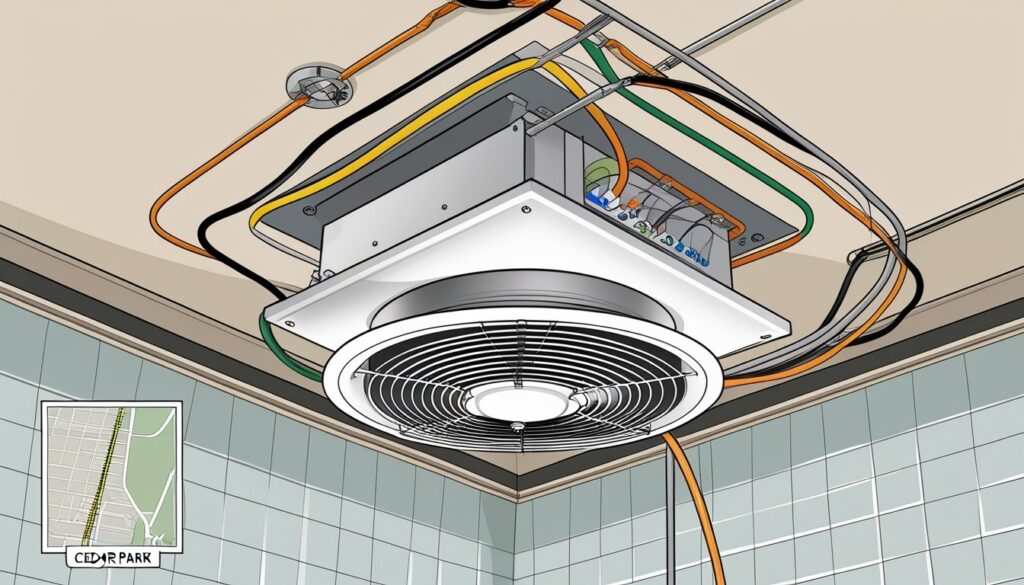
Bathroom fans usually run on a 120V circuit. You’ll see a hot (black), neutral (white), and ground (bare or green) wire. If the fan has a light or heater, there’s sometimes a second hot wire so you can flip each part on and off separately.
Always shut off the breaker first. Use wire nuts that fit the wires, and tuck everything in a listed junction box. For ceiling fans, use a fan-rated box that can handle the weight.
When replacing a fan, match the wattage and amperage to what the circuit can handle. Most bathroom circuits are 15A, but check your panel. For fans with multiple features, follow the manufacturer’s wiring diagram to keep things straight.
Common Wiring Setups
Single-switch fans are straightforward: one hot wire from the switch connects to the fan’s hot lead. The neutral goes right to the fan. This is the go-to for basic installs.
Dual-switch setups let you control the fan and light (or heater) separately. You’ll see a black and a red hot wire coming from the switch box. Cap off any unused wires. For timer fans, just swap in a timer switch for the standard one—it’ll control the fan hot.
You can put multiple fixtures on one circuit, but don’t overload it. Use GFCI or AFCI protection if code says so. Label the circuit in your panel so the next person knows what’s what.
Local Cedar Park Electrical Codes
Cedar Park uses Texas and National Electrical Code (NEC) standards, plus local tweaks. Bathrooms need at least one 20A branch circuit for outlets. Exhaust fans usually share a lighting circuit, but can’t overload the required 20A bathroom outlet circuit.
Install fan motors by the manufacturer’s instructions, and make sure they’re listed for bathroom use. If the fan sits in a spot with water exposure, it needs to be rated for damp or wet locations. Ground all metal parts and fan housings.
Permits and inspections are a must for new wiring or big changes in Cedar Park. Licensed electricians handle code compliance and inspections. Magnify Electric’s team sorts out permits and keeps your project up to code, offering a full range of electrical services in Cedar Park and Central Texas.
Step-By-Step Guide to Wiring a Bathroom Exhaust Fan
Here’s what you’ll need, how to stay safe, and how to wire up your fan so it works with your switches and protections.
Essential Tools and Materials
Before you start, grab a voltage tester, wire strippers, needle-nose pliers, screwdrivers, electrical tape, and a drill with bits. Use 14/2 or 12/2 NM cable depending on circuit ampacity; check the fan label for amps. Get wire nuts that fit the number of wires and a metal or plastic junction box for ceilings. If your fan has a light or heater, you’ll need extra conductors or 3-conductor cable.
You might want a fan-rated mounting bracket or support brace for between-joist installs. Keep some spare screws, a bit of flexible conduit (if code wants it), and GFCI or AFCI devices handy. Planning a new switch spot? Grab a wall box and switch plate.
Wiring Safety Procedures
Kill the power at the main breaker and tag the panel so nobody flips it back on. Double-check with a non-contact voltage tester on all wires before you touch anything. Wear safety glasses and gloves to avoid surprise injuries.
Follow code: use GFCI protection where required. Always tie the fan’s ground to the house ground and the metal box if there is one. Make tight connections with the right size wire nuts and wrap with tape for vibration resistance. Don’t splice wires in open ceiling spaces; keep all splices in a box with a cover.
If you’re not comfortable near live wires, just call a licensed electrician. Magnify Electric’s crew can install, check, and add GFCI/AFCI protection, new circuits, or switches to keep things safe and legal.
Connecting to Existing Circuits
Figure out if the bathroom outlet and fan share a circuit. If they’re on the same 20A bathroom circuit, make sure there’s enough capacity before adding the fan. Need a dedicated circuit? Run a new 20A 12/2 cable from the panel to the fan. For fans with lights or heaters, you’ll want 12/3 or separate circuits.
In the ceiling box, connect black (fan hot) to the switched hot from the wall, white to neutral, and green/bare to ground. If a white wire is used as a hot, mark it with tape. Use pigtails for multiple hots on one feed. Secure the cable clamp and tuck wires under the cover.
Restore power and test: flip the switch, check the light, and make sure the fan runs quietly. If breakers trip, wires get hot, or anything feels off, shut it down and call a pro. Magnify Electric handles wiring, troubleshooting, and upgrades in Cedar Park and nearby areas.
Choosing the Right Exhaust Fan for Your Cedar Park Home
Pick a fan that handles moisture, keeps mold away, and fits your space. Think about noise, energy use, and whether you want extras like lights or humidity sensors.
Features to Consider
Check the noise rating in sones—the lower, the quieter. For most bathrooms, 1.0–2.0 sones is comfortable. ENERGY STAR models help you save on power bills.
Want a humidity sensor or timer? Humidity sensors kick the fan on when moisture rises, which helps stop mold. Timers keep the fan running after you shower, so you’re not wasting electricity.
Look for combos like light-plus-fan or heater-plus-fan if you want fewer holes in your ceiling. Check the motor type—sealed, maintenance-free motors usually last longer. Make sure the grille and duct size fit your space.
Magnify Electric’s electricians can install these fans and help you pick features that fit your bathroom and budget. They handle simple swaps, smart controls, and full ventilation upgrades.
Sizing and Ventilation Requirements
Measure your bathroom’s square footage to figure out the right CFM (cubic feet per minute). Use 1 CFM per square foot as a starting point. So, a 50 sq ft bathroom needs a 50 CFM fan. Bump up the CFM if you have big tubs, multiple shower heads, or a closed-off toilet area.
High ceilings or vaulted spaces? Add 20–30% more CFM. Long duct runs, sharp bends, or skinny ducts will cut down airflow—so upsize the fan or shorten the run if you can.
Always vent the fan outside, never into the attic. Use smooth, insulated ducting and a backdraft damper to keep air and energy from leaking. Cedar Park code might require GFCI-protected power and specific venting—our team knows the rules and handles permits and inspections as needed.
Professional Installation vs. DIY in Cedar Park
Sometimes it’s worth paying for professional work. You’ll need to weigh cost, safety, and local rules before deciding who does the wiring.
When to Call a Licensed Electrician
If your bathroom wiring is complicated—maybe it feeds multiple circuits, uses tight junction boxes, or needs a new circuit—call a licensed electrician. Running new wire through finished walls, wiring up fan/light combos, or adding humidity sensors and timers? Those jobs need solid grounding, GFCI protection, and sturdy mounting.
Pros also cut down on fire and shock risk. They can track down tripped breakers, hidden faults, and make sure the fan vents outside. Magnify Electric’s licensed techs handle simple swaps, rewires, smart controls, and emergencies in Cedar Park and nearby towns.
Permitting and Inspection Rules
Cedar Park and nearby cities require permits for new wiring, new circuits, and big fixture changes. Permits protect you by making sure the work meets NEC and local rules. Skip the permit and you might run into trouble when selling or filing insurance claims.
Electricians pull permits and set up inspections. Inspectors check wiring, box fill, labeling, GFCI/AFCI protection, and venting. Hiring a pro helps you pass inspection and keeps a record of compliant work. Magnify Electric works across Spicewood, Austin, Bee Cave, Lakeway, Dripping Springs, Georgetown, Leander, Round Rock, Kyle, Liberty Hill, Westlake, The Hills, Briarcliff, Horseshoe Bay, Sunset Valley, Hutto, and nearby spots, offering permit-ready installs and inspection support.
Troubleshooting Common Wiring Problems
Here’s how to spot damaged wiring and fix power or noise issues safely. The steps focus on simple tests, easy repairs, and when to call a pro.
Identifying Wiring Issues
Watch for these signs: lights flicker when the fan runs, breakers trip when the fan turns on, scorch marks or burning smells at the fan, and warm outlets or switches. Turn power off at the breaker before checking the fan grille, wiring, and switches. Look for loose wire nuts, frayed insulation, or wires pulled out.
Double-check with a non-contact voltage tester before touching anything. If you spot charred wires or melted plastic, don’t mess with it—call a licensed electrician. Label any loose wires and snap photos for your pro. Sometimes you can tighten small screws, but burned connections need replacing.
Resolving Power or Noise Problems
If your fan hums, rumbles, or runs slowly, check the motor capacitor and mounting screws first. Tighten any loose bolts and clear out dust from the motor and blades. Swapping out a rattling grille or old rubber pads can help cut down vibrations and noise.
For power loss, reset the circuit breaker and test the switch with a multimeter. If the switch or pull chain feels worn out, just replace it. When the breaker keeps tripping, isolate the fan’s circuit and look for shorts at the switch, fan, or junction box. If you’re staring at a rat’s nest of wires or the breaker keeps tripping for no good reason, it’s probably time to call a licensed electrician.
Magnify Electric works in Cedar Park and nearby Central Texas towns, offering licensed electricians for wiring, smart home setups, EV chargers, panel upgrades, surge protection, and emergency repairs. Our team handles everything from quick fixture swaps to whole-home rewiring, commercial lighting, and safety inspections—fast and safe.
Energy Efficiency and Smart Controls
You can cut energy use and noise but still keep your bathroom air fresh. Smart timers and motion sensors help save runtime, and a few wiring tweaks make things run smoother.
Timers and Motion Sensors
Timers let you set exact run times for the exhaust fan, so it shuts off automatically after all that steamy air is gone. Pick a timer that fits your switch box, or try a digital in-line timer for the fan’s power feed. Ten to twenty minutes works for short showers, but go 30–60 minutes if someone’s taking a long bath.
Motion sensors start the fan only when someone enters. Passive infrared (PIR) sensors react quickly and let you tweak sensitivity—handy if you want to avoid the fan kicking on every time your cat walks by. For shared bathrooms, pair a motion sensor with a manual override switch so you can keep the fan running when you need it.
Timers and sensors both help slash wasted runtime and lower your electric bill. Make sure the device matches your fan’s motor type (AC or DC) and the circuit’s capacity, or you’ll end up with tripped breakers or worn-out parts.
Best Practices for Reducing Energy Use
Go for a high-efficiency fan rated by CFM (cubic feet per minute) and sones (noise). You want just enough CFM to clear humidity—usually 50–90 CFM for a standard bathroom—and a sones rating under 1.5 for peace and quiet. DC motor fans use less power than old AC models.
Wire in humidity-sensing controls so the fan runs only until the air dries out. Pair humidity sensors with intermittent timers to stop short cycling. Seal up the duct run and pop in a backdraft damper to keep your heated or cooled air from sneaking outside when the fan’s off.
If you’re unsure about choosing or wiring controls, Magnify Electric’s licensed electricians work all over Cedar Park and Central Texas. We handle smart home installs (like Lutron), automated lighting, EV chargers, panel upgrades, surge protection, and full wiring—residential or commercial. From fixture swaps to big lighting projects, safety checks, and emergency repairs, we keep your fan and controls safe and efficient.
Maintenance Tips for Long-Lasting Performance
Keep that fan clean. Kill the power at the breaker, pull off the cover, and vacuum dust from the grille and motor. Dust makes the motor work harder and cuts its lifespan.
Check wiring and connections every 6–12 months. Watch for loose screws, frayed wires, or any hot smells. If you spot trouble, it’s safer to call a licensed electrician.
Lubricate moving parts if your fan allows it. A couple drops of light oil can quiet things down and reduce wear. Don’t force anything—check the manual first.
Test the venting path. Make sure the duct runs all the way outside and the exterior cap opens without sticking. Blocked vents trap moisture and can lead to mold or drywall damage.
Timers or humidity sensors help avoid running the fan too long. Only running as needed saves energy and motor life. Smart switches or automated controls make life even easier.
Book a yearly inspection for peace of mind. Our licensed electricians handle installations and repairs, panel upgrades, surge protection, EV chargers, smart home systems, outdoor and recessed lighting, smoke/CO₂ detectors, and more. You’ll get reliable safety checks and quick repairs.
We serve Spicewood, Austin, Bee Cave, Lakeway, Dripping Springs, Georgetown, Leander, Round Rock, Kyle, Cedar Park, Liberty Hill, Westlake, The Hills, Briarcliff, Horseshoe Bay, Sunset Valley, Hutto, and other Central Texas communities. For homes or businesses, Magnify Electric handles everything from simple fixture swaps to full upgrades and emergency support.
Frequently Asked Questions
Here’s where you’ll find info on checking wiring, safety steps, a basic wiring process, common wiring problems, when to hire a pro, and the tools and parts you’ll need. Read each answer before you start—knowing what to expect makes everything smoother.
How can I tell if my bathroom exhaust fan is wired correctly?
Turn off the circuit breaker, then turn it back on and test the fan with its switch. The fan should run smoothly, and the light (if included) should work. The switch should only control what it’s supposed to.
You shouldn’t see sparks, smell burning, or trip breakers when the fan runs. If the fan hums, vibrates, or trips the breaker, the wiring or motor might be the issue.
Check that the fan is grounded and wire connections are tight in a junction box. Loose or ungrounded wires can be a real safety risk.
What safety precautions should I take when installing a new exhaust fan in my bathroom?
Always shut off power at the breaker and double-check with a non-contact voltage tester. Lock or tag the breaker if you can, just in case.
Wear safety glasses and gloves, and use a sturdy ladder. Keep water away from the work area and dry your hands and tools.
Use the right wire gauge and connectors, and follow local code for boxes and venting. If you come across damaged wiring, stop and call a pro.
Can you provide a step-by-step guide for wiring a bathroom exhaust fan?
Turn off the breaker for the fan’s circuit and make sure the power’s off. Take out the old fixture and check the ceiling box for any damage.
Mount the new fan bracket to the box and run the power cable into it. Match wires by color: black (hot) to black, white (neutral) to white, green or bare (ground) to ground.
Twist on wire nuts, tuck wires in, and attach the fan to its bracket. Connect the ducting to the fan’s vent and restore power to test it.
Follow the manufacturer’s wiring diagram and local code. If your fan has extra wires for a light or timer, hook them up to the right switches.
What are the common issues to look out for when wiring a bathroom exhaust fan?
Wrong wire gauge or loose wire nuts can cause overheating and trips. Make sure your wire size matches the circuit amperage.
Improper grounding or missing neutrals can cause shocks or flickering lights. Check that ground and neutral connections are tight.
Poor venting—like kinks or the wrong duct size—leads to moisture and motor stress. Also, don’t overload a circuit by adding a fan where it can’t handle it.
Is it necessary to hire a professional to wire my bathroom exhaust fan, or can I do it myself?
You can install lots of fans yourself if you know basic electrical safety and follow the code. Swapping a small fixture is usually within DIY reach.
Call a licensed electrician if you need new wiring, changes to the circuit, panel upgrades, or if you’re not comfortable with live wires. For commercial jobs or home automation, hiring a pro just makes sense.
Magnify Electric’s licensed electricians handle everything from simple swaps to full upgrades. We offer expert service for residential and commercial jobs—smart home systems, panel repairs, EV charger wiring, outdoor lighting, and more.
What materials do I need to successfully wire a bathroom exhaust fan by myself?
You’ll want a fan unit, Romex cable (pick the right gauge—usually 14/2 for 15A, 12/2 for 20A), wire nuts, a grounded metal or plastic junction box, and a switch that can handle the fan’s load.
Grab a non-contact voltage tester, screwdrivers, wire strippers, pliers, some electrical tape, and a ladder. Don’t forget ducting, foil tape, and a vent cap for where the air exits outside.
If you hit a snag or just don’t feel like messing with electrical stuff, you can always call Magnify Electric. We work in Cedar Park and a bunch of Central Texas spots—Austin, Round Rock, Leander, Bee Cave, Lakeway, Dripping Springs, Georgetown, Kyle, Liberty Hill, Westlake, The Hills, Briarcliff, Horseshoe Bay, Sunset Valley, Hutto, Spicewood, and pretty much anywhere nearby. We handle quick fixture swaps, bigger upgrades, commercial lighting, safety checks, smart home setups, and emergency calls too.