Adding recessed lighting to your living room can brighten up the space right away, and you won’t have bulky fixtures hanging down from the ceiling. Recessed lights give you clean, focused light that makes your room feel more open and inviting. They’re a great pick if you want a modern vibe and want to show off your décor while keeping things cozy.
Sure, installing recessed lighting might sound a bit intimidating, but with some guidance, you can absolutely pull it off. Whether you’re a DIY type or you’d rather call in a pro, knowing the basics helps you decide where to put lights and which ones to pick. If you’d rather leave it to the experts, Magnify Electric has licensed electricians who can tackle any electrical job, so your project’s safe and up to code.
Magnify Electric handles both home and business electrical work—everything from lighting upgrades to new wiring. Their team brings real experience and attention to detail. You can count on them to help you create the lighting setup that fits your space and style.
Understanding Recessed Lighting
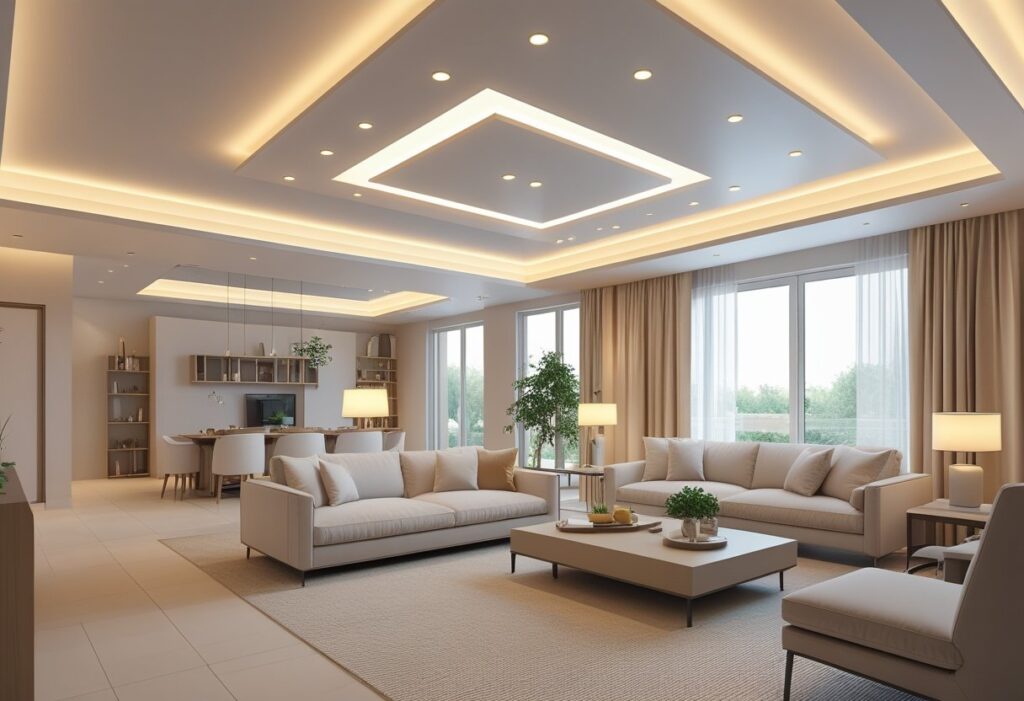
Recessed lighting gives you that clean, modern look that just works in so many living rooms. This type of lighting goes right into your ceiling, offering focused or ambient light without any clunky fixtures. Here’s what recessed lighting is, why it’s a solid choice, and how to pick fixtures that’ll actually work for you.
What Is Recessed Lighting?
Recessed lighting means the lights are built into the ceiling instead of hanging down. The fixtures sit flush, so you get a smooth, uncluttered ceiling.
These lights shine down or at an angle, depending on how you set them up. They work for general lighting or for spotlighting a specific area—maybe a reading nook or a piece of art.
Since they’re tucked away, they won’t hog space or mess with your room’s style. Recessed lighting is especially handy in rooms with lower ceilings where traditional fixtures feel too bulky.
Benefits of Recessed Lighting in a Living Room
Recessed lighting can really change how your living room feels. For one, it lights up the whole area evenly, so you don’t get those annoying dark corners.
Because these lights don’t hang down, the room looks bigger and less crowded. Dimmable recessed lights let you set the mood—bright for activities, soft for relaxing.
LEDs for recessed fixtures help cut down your electric bill and last longer than regular bulbs, so you won’t be changing them all the time.
Choosing the Right Type of Fixtures
Choosing fixtures is where you set the tone for your living room. Think about size, style, and light temperature.
If you want something subtle or plan to use a bunch of lights, go for smaller fixtures. Larger ones work if you want a main light source.
Pick LED bulbs with a color temperature of 2700K to 3000K for that warm, inviting glow. Make sure your fixtures fit your ceiling type, and if your room gets humid, check that they’re rated for it.
Need help with installation or picking the right stuff? The licensed electricians at Magnify Electric can guide you, from choosing fixtures to making sure everything’s installed safely and up to code.
Planning Your Living Room Lighting Layout
Lighting should make your living room feel comfortable and useful. You’ll want to figure out which spots need light, where to put the fixtures, and how many will give you the right vibe. Planning ahead helps you skip the headache of shadows and glare.
Assessing Your Room’s Lighting Needs
Start by thinking about what you actually do in your living room. Do you read, binge shows, or host friends? Each activity needs its own kind of lighting. Reading corners need brighter, focused lights, but general lighting should be softer so you don’t strain your eyes.
Check your room’s size, ceiling height, and how much sunlight you get. If you’ve got tons of natural light, you may not need as many fixtures or you might want dimmers. Think about highlighting special spots, like artwork or shelves.
Deciding Placement for Fixtures
Place recessed lights evenly across the ceiling, but don’t put them too close to walls or you’ll get weird shadows. Usually, spacing them about 4 to 6 feet apart does the trick.
Focus a few lights on main areas like where you sit or watch TV. If you want to show off a fireplace or some art, angle the lights to draw attention there.
Try sketching your idea or use tape on the ceiling to mark out where you want each light. It’s a simple way to see if your plan actually works before you start cutting holes.
Calculating the Number of Lights Needed
To figure out how many lights you’ll need, measure your room’s length and width, multiply them for total square footage, and then divide by how much area each light covers—usually 16 to 25 square feet for LED recessed lights.
Say your room is 16×20 feet (320 square feet). If one light covers 20 square feet, you’ll need 16 lights (320 ÷ 20 = 16).
Adjust up or down if you want it brighter or dimmer. If you need help planning, Magnify Electric’s electricians can help you get the brightness and layout just right.
Tools and Materials Checklist
Before you start adding recessed lighting to your living room, make sure you’ve got the right tools and materials. It’ll make the job smoother and safer. You’ll want tools for cutting, wiring, and installing, plus lighting kits that fit your style and electrical setup.
Essential Tools for Installation
Here’s what you’ll need:
- Stud finder to locate ceiling joists
- Electric drill with a hole saw to cut holes for fixtures
- Wire strippers to prep wiring
- Voltage tester to double-check the power’s off
- Screwdrivers (flathead and Phillips)
- Pliers for twisting wires
- A ladder tall enough to reach the ceiling
Having these on hand helps you work faster and with fewer mistakes.
Selecting Lighting Kits and Accessories
When you’re choosing recessed lighting kits, go with LED fixtures to save on energy and reduce heat. Make sure the housings fit your ceiling depth and the layout you want.
You’ll also want:
- Mounting brackets to keep fixtures secure
- Wiring connectors that match your setup
- Dimmer switches if you want to adjust brightness
- IC-rated housings if the lights will touch insulation
If you’re not sure about what to buy, Magnify Electric’s team can help you pick the right parts or even handle the install. They’re pros at both home and business jobs.
Preparing Your Living Room
Before you start installing, get your living room ready. That means turning off the power, planning where the lights will go, and making sure your ceiling can fit the fixtures.
Turning Off Power Safely
First things first—shut off the power where you’ll be working. Find your electrical panel and flip off the breaker for the living room lights.
Use a voltage tester on the wires to double-check that there’s no power. Don’t skip this—nobody wants a shock.
If you can’t figure out which breaker is which, you can always turn off the main breaker, but that’ll cut power to your whole house. Always stick to safety guidelines when working with electricity.
Marking Light Locations
Measure and mark where you want each recessed light. A tape measure and pencil work fine.
Keep lights spaced evenly—about 4 to 6 feet apart is typical.
Watch out for beams, vents, or cabinets that might get in the way. Think about how the lights will highlight your furniture and set the mood.
Use a ladder to check your marks from the floor to make sure the layout looks right.
Checking Ceiling Clearance
Measure above your ceiling to see if the fixtures will fit. Most need at least 5 or 6 inches of clearance.
Look for joists, pipes, or ductwork that could block installation. A stud finder helps, or peek into the attic if you can.
If space is tight, look for shallow LED fixtures. Just make sure your lights won’t touch insulation, since that can cause overheating.
If you’re not sure, Magnify Electric can check your ceiling and help you pick the right fixtures. They’re careful and know how to keep your project safe and efficient.
Cutting and Wiring for Recessed Lighting
Before you can install the lights, you’ll need to cut the ceiling and run wiring. You’ll also want to connect switches or dimmers so you can control the lights how you want. Each step needs some patience and attention to detail.
Installing Ceiling Cutouts
Measure and mark where each light will go using the template that comes with your fixture. Double-check for joists, pipes, or wires before you cut.
Use a drywall saw or hole cutter to make your holes. Go slow—mistakes here are a pain to fix. Clean out any debris and make sure the holes are smooth.
If cutting isn’t your thing, Magnify Electric’s electricians can do it for you and get it right the first time.
Running Electrical Wiring
Run wires from your power source to each recessed fixture. Always turn off the breaker before you start.
Use the right wiring, like Romex, and run cables through junction boxes. Secure wires so they don’t wiggle loose. Stick to local codes for safety.
Measure before you cut wire—too much slack or too tight is no good. Use wire cutters and strippers to prep the ends.
If you’re running cables through joists, drill in the center so the wires don’t get nailed or screwed. When you’re done, seal around boxes to stop drafts and keep things safe. If you want help, Magnify Electric can make sure your wiring is up to snuff.
Connecting Dimmers and Switches
To control your new lights, you’ll need to hook up dimmer or standard switches.
Turn off the power, then run wires from your light circuit to the switch box. Connect the black (hot) wire to the switch, twist all the white (neutral) wires together, and connect the green or bare wire to ground.
If you’re using dimmers, make sure they’re compatible with your LED bulbs—otherwise you might get flicker.
Test connections before closing up the switch box. Flip the breaker back on and check your work. Proper switches and dimmers let you control brightness and save energy.
Magnify Electric can handle all the wiring and switch installs, whether your project’s simple or a bit more involved.
Installing Recessed Light Housings
Installing recessed light housings is about placing and securing the fixtures inside your ceiling. You’ll want to pay attention to where each one goes for even light, and make sure they’re solidly in place. Once that’s done, you’ll add bulbs and trims to finish up.
Positioning and Securing the Housings
Pick your light spots based on how much illumination you want. Space the housings evenly to avoid dark patches or glare—about 4 to 6 feet apart is usually good.
Cut holes where you marked, then pop the housings in. Fasten the mounting brackets tight to the joists or framing so nothing shifts or falls.
Use screws or clips to keep everything in place. Make sure the housing sits flush with the ceiling for a clean look. Connect the wiring inside the housing, and always turn off the breaker before you start messing with wires.
Attaching Light Bulbs and Trims
Once you’ve got the housings secure and wired, it’s time to choose bulbs that fit your needs. LEDs are honestly hard to beat—they’re energy-efficient and last ages.
Twist each bulb gently into the socket inside the housing. After that, snap or screw the trim around each fixture. The trim hides the housing edges and shapes the light, and you can pick from a bunch of finishes and styles to blend with your room. Just make sure the trims are on tight so they don’t rattle or drop unexpectedly.
Don’t forget to test every light after you’re done. Flip the switch and make sure everything’s glowing as it should. If you’re feeling unsure about the wiring or want things done right, Magnify Electric’s licensed electricians are ready to jump in. We handle all lighting projects for homes and businesses, and we’re pretty efficient about it.
Final Steps and Safety Checks
After installing your recessed lighting, double-check that everything’s working and safe. It’s worth catching any hiccups now, rather than later.
Testing Your New Lighting
First, turn the power back on at the breaker. Hit the switch and see if all the recessed lights fire up. If any stay dark, check the bulbs—maybe they’re loose or the wrong type.
Keep an eye out for flickering or dimming. That might point to a loose wire or a wiring issue. If you’ve got a voltage tester handy, use it to make sure the power’s flowing right.
Touch the fixtures after they’ve been on for a bit—they should stay cool. If you feel heat, or worse, smell burning or see sparks, shut off the power right away and call a pro.
Troubleshooting Common Issues
If a light won’t turn on, double-check the breaker and the switch. Still nothing? Peek inside the fixture or junction box for loose wires.
Flickering lights can drive you nuts. Usually, it’s a bad connection or a dimmer switch that doesn’t play well with your bulbs. Try swapping the bulb or the dimmer.
Sometimes, trims or housings just don’t fit right. That can cause heat to build up or light to leak where you don’t want it. Check that every part matches your recessed lights’ specs.
For anything trickier than these basics, maybe just call Magnify Electric. Our electricians handle all sorts of lighting jobs safely, so you don’t have to stress about codes or fire hazards. We’re here for both home and business projects.
Adding Ambiance With Recessed Lighting
You can really change the vibe of your living room by layering your lighting and tweaking the brightness. The right setup lets you go from bright and lively to soft and relaxed, depending on what you’re up to.
Layering Lighting for Cozy Effects
Layering’s all about mixing different types of lights. Recessed lights give you the main glow, but adding floor lamps, table lamps, or wall sconces fills in shadows and highlights your favorite spots. This combo makes the whole room feel balanced and warm.
Try spacing your recessed lights evenly so you don’t end up with weird bright patches. Go for warm color temperature bulbs—somewhere around 2700K to 3000K. That soft, cozy light just feels better than the harsh, cold stuff.
Point a few fixtures toward artwork or seating if you want to draw attention. Lamps in corners or by side tables help chase away the gloom and make everything feel more inviting.
Using Dimmers for Mood Control
Dimmers really make a difference. With a dimmer switch, you can crank the lights up for cleaning or dial them down for movie night. No need to rewire anything, either—just pick dimmers that work with LEDs so you don’t get flickers or buzzing.
With adjustable lighting, you can set the mood in your living room for any occasion. Dimmers put you in control, whether you’re hosting a crowd or just chilling solo.
If you want help getting it all set up, Magnify Electric’s crew knows their stuff. We do both residential and commercial work, and we’re happy to walk you through your options.
Maintenance and Care
A little upkeep goes a long way with recessed lighting. Clean fixtures and timely bulb swaps keep your living room bright and trouble-free.
Cleaning Tips for Fixtures
Dust loves to settle on light fixtures, and it can really dull your lighting. Always turn off the power before cleaning—better safe than sorry. Use a soft cloth or microfiber duster to wipe down the trim and inside the fixture.
Skip the water and harsh cleaners; they can mess up the finish or cause electrical issues. If your fixture has a glass cover, you can take it off and wash it with mild soap and water. Just make sure it’s bone dry before you put it back.
Give your fixtures a quick dusting now and then to keep them shining and to help prevent overheating.
When to Replace Bulbs or Components
Swapping out bulbs when they start to flicker or dim keeps your lighting even. LEDs last a long time, but not forever. If you notice changes in brightness or color, it’s probably time for a new bulb.
Sometimes, other parts like the trim or wiring show wear, too. If you spot cracks, discoloration, or hear buzzing, get a licensed electrician to check things out.
Magnify Electric can handle bulb replacements or fix any components you’re not comfortable with. Letting pros take care of it means updates are safe and up to code.
Considering Energy Efficiency
Adding recessed lighting? It’s smart to think about energy-efficient options—they save you money and help the environment. Picking the right bulbs and using less power just makes sense.
LED vs. Other Bulb Options
LEDs use way less electricity than old-school incandescent or halogen bulbs, and they last much longer. Fewer replacements mean less hassle. Compared to CFLs, LEDs turn on right away and don’t have mercury, so they’re safer and easier.
If you’re looking to cut your energy bills, switching to LED recessed lighting is a no-brainer. You can pick color temperatures that suit your style, from warm white to daylight, without giving up efficiency.
Magnify Electric can help you pick the best LEDs for your space. Our electricians install lights cleanly and quickly, making sure they fit your look and your budget.
Reducing Power Consumption
Besides using LEDs, try adding dimmer switches to your recessed lights. Dimmers let you lower the brightness when you don’t need full power, which saves energy and helps bulbs last longer.
Don’t crowd your ceiling with too many fixtures. Too many lights waste energy and can cause glare. Spread them out and mix in lamps or sconces for a layered look.
At Magnify Electric, we’ll check out your room and suggest the best layout. Our team sets up your recessed lighting to use power efficiently and meet safety standards, so you get a bright space without the big electric bill.
Frequently Asked Questions
Getting your living room lighting just right depends on placement, spacing, and picking the right fixtures. Sometimes, it’s worth knowing when to bring in a pro—especially if your ceiling’s tricky or you want a smooth install.
What are the best practices for placing recessed lights in a living room?
Ring the room’s edges with recessed lights to keep corners bright. Use them to highlight spots like sofas or artwork. Keep the spacing even and mix in lamps or sconces for a balanced glow.
Can I install recessed lighting in my living room on my own, or should I hire a professional?
If you know your way around electrical work, small projects might be doable. But honestly, hiring a licensed electrician is safer. Magnify Electric’s team takes care of everything, so you don’t have to worry about safety or codes.
How do I determine the optimal spacing for recessed lighting fixtures in my living room?
A good rule: space the lights about 4 to 6 feet apart. Ceiling height matters too—divide the height by two for a starting point in feet. Adjust as needed for dimmers and extra fixtures to avoid weird shadows.
What are some creative ideas for integrating recessed lighting into a living room’s design?
Try dimmers for mood shifts. Mix recessed lights with floor lamps or sconces. Aim lights at textures or cool architectural features to add depth and a bit of drama.
Is it possible to install recessed lighting in a living room with a concrete ceiling?
You can, but it’s a tougher job. You’ll need special tools and mounting brackets for concrete. Best to leave this one to the pros at Magnify Electric—they’ve got the gear and know-how to do it right.
What types of recessed lighting are recommended for creating a cozy atmosphere in a living room?
Warm LED bulbs that let you adjust the brightness are a solid pick. I’d suggest hunting down fixtures marked “dim-to-warm”—they really nail that soft, golden glow you get from old-school incandescent bulbs when you turn the lights down. It just makes the whole room feel more relaxed and welcoming, you know?