Installing an outdoor electrical outlet can significantly enhance the functionality of your outdoor space, making it easier to power tools, lights, and appliances without fuss. By following a few straightforward steps, you can successfully install a weatherproof outlet that meets all safety codes, providing you with convenient access to electricity whenever you need it.
At Magnify Electric, our team of licensed electricians is here to assist with every aspect of your electrical needs. Whether you’re looking to add extra outlets for your outdoor projects or need help with lighting solutions, we are the best option for both residential and commercial electrical work.
Not only do outdoor outlets increase the versatility of your space, but they are also safe and easy to install. With a bit of preparation and the right materials, you’ll be ready to enjoy the convenience of electricity outdoors, enhancing your quality of life and expanding your outdoor activities.
Planning Your Outdoor Electrical Outlet Installation
Proper planning is essential for a successful outdoor electrical outlet installation. You need to consider your power source options, choose a safe location, and ensure that your electrical load capacity meets the requirements of your appliances.
Assessing Power Source Options
Begin by identifying suitable power source options for your outdoor outlet. The most common approach is to run a line from an existing interior outlet. This typically requires you to tap into a circuit within your home. Look for outlets on circuits that have enough capacity to handle the additional load.
Consult the National Electrical Code (NEC) for guidelines on safe practices. If unsure, consider hiring Magnify Electric. Our licensed electricians can ensure that you choose an appropriate circuit breaker and wiring for your outdoor needs.
Selecting a Safe Location
Choosing the right location for your exterior outlet is crucial. Look for areas that are easily accessible yet away from potential hazards like water sources. If you plan to use power tools, the outlet should be located near work areas or pathways.
Ensure the outlet is mounted at least 12 inches above the ground to prevent water accumulation. Using a weatherproof cover will protect the outlet from the elements, extending its lifespan. Additionally, ensure it’s not obstructed by landscaping or structures.
Determining Electrical Load Capacity
Assessing the electrical load capacity is key to preventing overloads. Calculate the total wattage of devices you plan to connect to the outdoor outlet. Common outdoor devices may include lights, pumps, or power tools.
Most household circuits are typically rated for 15 to 20 amps, which translates to about 1,800 to 2,400 watts. Choosing a circuit that can accommodate your needs is vital. If your planned usage exceeds the circuit capacity, consult with Magnify Electric to evaluate proper solutions.
By considering these factors, you can plan an effective and safe outdoor electrical outlet installation tailored to your needs.
Gathering Tools and Materials
Preparing for the installation of an outdoor electrical outlet involves collecting specific tools and materials. Ensuring you have everything ready will streamline the process and enhance safety and effectiveness in your project.
Essential Tools for Installation
Start by gathering the essential tools required for your installation. Key tools include:
- Voltage Tester: This is crucial for checking that the power is off before you start working.
- Wire Strippers: Necessary for stripping insulation off the wires to make proper connections.
- Screwdrivers: You will need both flathead and Phillips head screwdrivers for securing the outlet and electrical box.
- Drill: A drill will help insert screws securely into walls or any surface.
- Wire Connectors: Use these to ensure safe connections between the wires within the box.
Having these tools on hand from the beginning will empower you to work efficiently and effectively.
Choosing the Right Outlet Type
When selecting the outlet, consider using a GFCI outlet. GFCI outlets are designed to prevent electrical shock by shutting off power when they detect ground faults. This is especially important for outdoor installations where moisture can be a hazard.
Make sure to check the voltage requirements for your project, typically 120 volts for general use. Choose an outlet that suits your specific needs, such as accommodating outdoor appliances or lighting fixtures.
Choosing a GFCI outlet will enhance safety and meet building codes, providing peace of mind during your outdoor electrical work.
Selecting Weatherproof Components
Weatherproof components are essential to ensure the longevity and safety of your installation. Use an outdoor electrical box that is specifically designed for outdoor use. This will prevent moisture from seeping in and causing damage.
Additionally, pair your outlet with a weatherproof cover to protect it from rain and snow. This cover should be able to accommodate a plug when in use. Consider using conduit and cable clamps for securing wiring, especially if the wiring runs outside and is exposed to potential wear or damage.
At Magnify Electric, our licensed electricians can guide you in choosing the right weatherproof components, ensuring your outdoor outlet installation stands the test of time.
Ensuring Electrical Safety
When installing an outdoor electrical outlet, prioritizing safety is crucial. Key steps include turning off power at the breaker, testing the circuit for live voltage, and understanding electrical codes. This helps prevent accidents and ensures compliance with safety guidelines.
Turning Off Power at the Breaker
Before starting any electrical work, always turn off the power at the circuit breaker. Locate your main service panel and identify the breaker that controls the outlet circuit. Switch it to the “off” position.
Tip: Labeling your breakers can help identify them quickly in the future.
By cutting off power, you protect yourself from electrical shock. Once in position, verify that the power is indeed off by using a voltage tester. This device will confirm that there is no live voltage present, ensuring a safer installation process.
Testing Circuit for Live Voltage
After turning off the power, it’s essential to test the circuit to ensure it’s safe to work on. A voltage tester is a handy tool to confirm there is no electricity flowing through the wires.
Place the tester leads on the outlet terminals or the wire ends where connections will occur.
A few safety checks to follow:
- Single-Pole Switches: Ensure the tester beeps or lights up, confirming the circuit is live.
- GFCI Outlets: Familiarize yourself with the test/reset buttons; if the light is still on when untested, the circuit may still have power.
Remember, if you detect any voltage, reassess your circuit breaker settings. It’s wise to consult a licensed electrician if you feel uncertain.
Understanding Electrical Codes
Familiarizing yourself with electrical codes is vital for a safe installation. The National Electrical Code (NEC) outlines safety standards to ensure proper installation practices.
Key points to consider:
- Outdoor Receptacles: Must have weatherproof covers to prevent moisture intrusion.
- GFCI Requirements: Ground Fault Circuit Interrupter (GFCI) outlets are standard for outdoor use, reducing the risk of electrical shock.
Adhering to these regulations also eases the inspection process, ultimately avoiding potential fines or delays. For expert guidance, Magnify Electric provides licensed electricians who can help ensure your work complies with all necessary codes and standards for both residential and commercial needs.
Step-by-Step Outdoor Outlet Installation
Installing an outdoor electrical outlet requires careful preparation and execution. You will need to manage both the indoor and outdoor aspects effectively, ensuring safety and compliance with electrical codes. The following steps guide you through the installation process.
Preparing the Indoor and Outdoor Boxes
Start by identifying an interior outlet that is convenient for running a line to the outdoor outlet. Ensure the electrical box inside is compatible with the new installation. You’ll need to turn off the power at the breaker to ensure safety.
Next, select an outdoor electrical box that meets weatherproof requirements. Measure and mark the location where you will install it, ideally near a wall stud for easy mounting. Use a drill to create a hole through the wall, allowing access for the electrical cable.
After preparing the boxes, gather all necessary tools and materials, including pigtail wires, wire connectors, and cable clamps. This ensures you have everything ready for smooth installation.
Running and Securing Electrical Cable
Once the boxes are prepared, run the electrical cable from the interior outlet to the outdoor box. Use conduit for protection if the cable will be exposed to the elements. The conduit helps safeguard the wiring from damage and meets code requirements.
Secure the cable with cable clamps at both ends to prevent movement and strain on the connections. Ensure the cable is adequately attached to prevent any accidental disconnections.
Check that the cable length is appropriate and does not create tension in either box, as this could lead to complications during later stages of the installation.
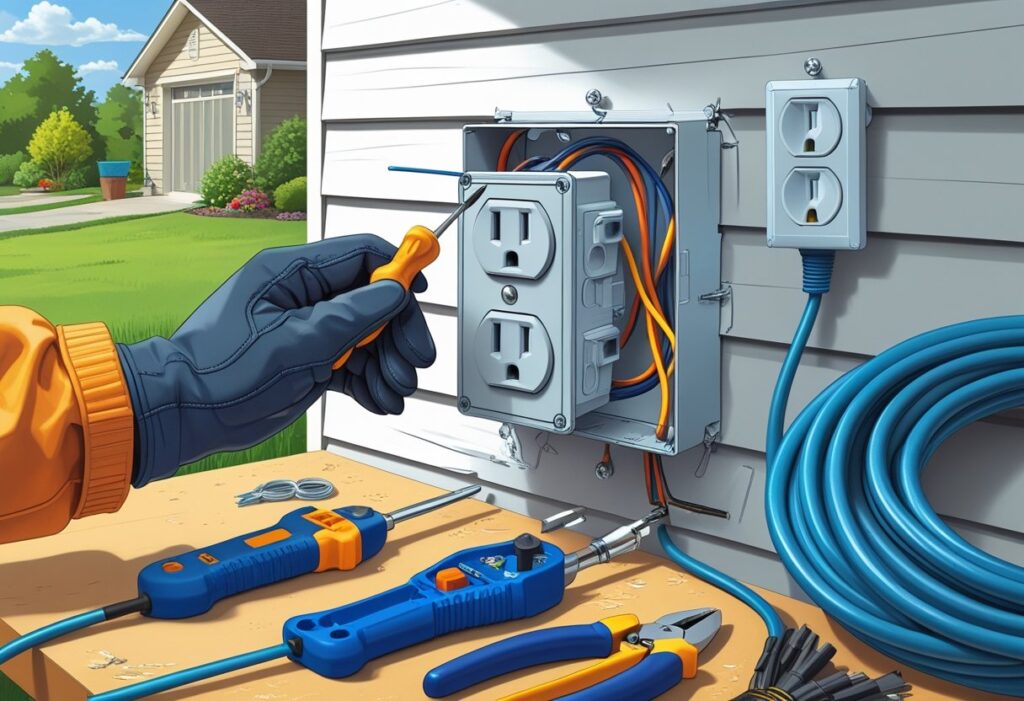
Wiring the New Outlet
Now, proceed to wire the new outdoor outlet. Strip the ends of the electrical cable to expose the wires. You’ll usually find a black (hot), white (neutral), and green or bare (ground) wire.
Connect the black wire to the brass terminal and the white wire to the silver terminal on the outlet. The green or bare wire should be connected to the green ground screw. Use wire connectors to secure any pigtails to ensure a solid connection for all wires.
Make sure all connections are tight and correctly positioned to avoid any electrical faults. It’s essential to follow local codes or consult with professionals like Magnify Electric if unsure, as safety is paramount.
Mounting and Sealing the Outdoor Box
Mount the outdoor electrical box securely to the wall, ensuring it aligns with the hole you drilled earlier. Use screws to secure it tightly against the wall stud, which provides stability.
After mounting, inspect all connections before sealing the box. Use an outdoor-rated weatherproof cover to keep moisture out. This step is critical for preventing electrical malfunctions and enhancing safety.
Lastly, apply sealant around the edges of the box where it meets the wall to prevent water ingress. Sequentially, restore power at the breaker and test the outlet to ensure everything is functioning correctly. If you need professional help, trust our team at Magnify Electric for expert assistance.
Upgrading Protection and Weatherproofing
To ensure the safety and longevity of your outdoor electrical outlets, upgrading protection and weatherproofing is crucial. This involves installing GFCI outlets, adding weatherproof covers, and checking for proper grounding. Each step enhances both safety and functionality.
Installing GFCI Outlets for Outdoor Use
GFCI (Ground Fault Circuit Interrupter) outlets are essential for outdoor installations. They monitor electrical current and shut off automatically if a ground fault occurs, reducing the risk of electrical shocks.
When installing, ensure the GFCI outlet is rated for outdoor use and located within the recommended distance from water sources, such as pools or sprinklers. Follow local electrical codes for proper installation.
Magnify Electric can assist you in selecting and installing the right GFCI outlets for your needs, providing safety and peace of mind.
Adding a Weatherproof Cover
A weatherproof cover is vital in protecting your outdoor outlets from moisture and debris. Look for covers that are rated for outdoor use, preferably those that include a secure latch or full enclosure.
Installing a weatherproof cover is straightforward. Make sure the cover fits tightly over the outlet and is made from durable, non-corrosive materials. Ideally, choose a design that allows for easy access while remaining protected when not in use.
This small addition significantly extends the lifespan of your outlets and enhances safety during inclement weather.
Checking for Proper Grounding
Proper grounding is a fundamental aspect of electrical safety. Ensure your outdoor outlets are well-grounded to prevent electrical shocks and improve the performance of your electrical system.
Inspect the outlet’s ground connection to make sure it’s securely attached and connected to the grounding system of your home. If you are unsure, consult with a professional.
Magnify Electric offers expert services in examining and upgrading your grounding systems, ensuring the reliability of your outdoor electrical work.
Testing and Using Your Outdoor Electrical Outlet
After installation, it’s important to ensure your outdoor electrical outlet functions correctly and safely. Knowing how to test the outlet and maintain it will help you avoid electrical hazards and keep your outdoor spaces well-lit and functional.
Restoring Power and Inspecting Connections
Before using your outdoor electrical outlet, check to see if it is powered. Locate your circuit breaker panel and ensure the breaker for the outdoor outlet is in the “On” position. If it has tripped, reset it and monitor to see if it holds.
Next, inspect the connections at the outlet. Remove the cover plate and ensure all wires are securely attached to the terminals. Look for signs of wear, such as frayed wires. If anything appears damaged, contact Magnify Electric for professional assistance.
Testing Electrical Functionality
Using a voltage tester, check if your outdoor outlet is functioning properly. Plug in the tester according to the manufacturer’s instructions. A reading of 120 volts indicates the outlet is correctly wired. If it shows no voltage or an incorrect reading, further investigation is needed.
If you plan to operate electrical tools or appliances, ensure they are rated for outdoor use. Always test the outlet again after any usage, especially if you’ve experienced electrical problems previously.
Safe Operation and Maintenance Tips
For your safety, keep your outdoor outlet covered when not in use. Use a weatherproof cover to protect it from moisture and debris. Periodically inspect the outlet for any signs of corrosion or damage.
Always avoid overloading the outlet with multiple devices. If your outdoor space requires more power, consider installing additional circuits. For expert installations and maintenance, Magnify Electric offers top-tier service for all your electrical needs, addressing both residential and commercial requirements effectively.
Frequently Asked Questions
Installing an outdoor electrical outlet involves several specific considerations to ensure safety and compliance with electrical codes. The following FAQs address common concerns to help you successfully complete your project.
What are the steps to install a new outdoor outlet box in a brick wall?
To install an outdoor outlet box in a brick wall, begin by selecting the right location for the outlet. Use a hammer drill to create a hole for the box. Next, secure a weatherproof outdoor outlet box in the hole and connect power by running appropriate wiring from an indoor source to the outdoor outlet.
How can I wire an outdoor power outlet using a conduit?
Start by selecting a conduit type suitable for outdoor conditions, such as PVC or metal. Run the conduit from the power source to the outlet location. Inside the conduit, run wires that meet local electrical codes and connect them to the outlet, ensuring all connections are secure and weatherproof.
What are the electrical code requirements for installing an outdoor outlet?
Electrical code requirements can vary by location, but generally, outdoor outlets must be GFCI-protected and weather-resistant. You should install them at least 12 inches above ground and located away from areas where water may accumulate, ensuring compliance with local regulations.
How do you weatherproof an outdoor electrical outlet?
To weatherproof an outdoor electrical outlet, use a weatherproof cover that seals around the outlet when not in use. Ensure all connections are properly sealed and use GFCI-rated outlets that are less susceptible to moisture. This protects your outlet from rain, snow, and humidity.
What is the proper method for installing an outdoor outlet post?
Begin by burying a treated post in concrete at the desired location. Mount an outdoor outlet box securely to the post at least 12 inches off the ground. Run electrical wiring inside the post and connect it to the outlet, following all safety standards.
Does an outdoor electrical outlet need to be GFCI-protected?
Yes, any outdoor electrical outlet must be GFCI-protected to minimize the risk of electrical shock. GFCI outlets cut off electricity in case of a short circuit, making them mandatory for safety in outdoor settings.
For any electrical work you need, consider reaching out to Magnify Electric. Our team of licensed electricians is prepared to assist with everything from installing outlets to managing complex electrical systems for residential and commercial needs.