If you want to replace your dimmer switch with a regular switch, you can do it yourself with basic tools. Turn off the power at the breaker before you start removing the dimmer and wiring in the regular switch.
This keeps you safe and makes the replacement straightforward. Switching from a dimmer to a standard switch can improve compatibility with certain bulbs or just give you a simple on/off option.
You’ll need to disconnect the dimmer, connect the wires to the new switch, and test that everything works. Take your time and follow safety steps to make sure the swap goes smoothly.
Understanding Dimmer Switches vs. Regular Switches
Switches control your lights in different ways. Some allow you to adjust brightness, while others only turn the light on or off.
Knowing the differences helps you decide when and why to switch from a dimmer to a regular switch.
Key Differences Between Dimmer and Standard Switches
A dimmer switch lets you adjust the light’s brightness by controlling the electrical flow to the bulb. This can help create the right mood and save a bit of energy.
A standard switch only turns the light on or off. It’s simple with no extra settings.
Standard switches are easier to install and use less electricity than some dimmers. Dimmer switches must be compatible with your bulbs.
Using the wrong bulb or dimmer can cause flickering or overheating. Regular switches don’t have this problem because they supply full power or no power.
When to Replace a Dimmer with a Standard Switch
Replace a dimmer if you don’t need adjustable lighting. For example, in places where you only want lights fully on or off, like closets or bathrooms, a regular switch works well.
If your dimmer switch causes flickering or gets warm, it might not handle the load properly. Replacing it with a regular switch can solve safety problems.
Older dimmers might not work well with LED bulbs. If you change your bulbs and face flickering, switching to a regular switch can help.
Ideal Locations for Regular Switches
Regular switches are perfect in spots where you always want full light, like bedrooms, kitchens, or hallways. They also work well in rooms with multiple switches controlling one light when you don’t need to adjust brightness.
Standard switches are a good choice for kids’ rooms or any area where easy operation matters.
Safety Precautions Before Starting
Before you swap out your dimmer switch, follow important steps to keep yourself safe. Make sure the power is completely off, test to confirm no electricity is running, and use the right safety gear.
Shutting Off Power at the Circuit Breaker
Always turn off the power at the circuit breaker before touching any wiring. Find your home’s breaker panel and switch off the breaker that controls the lights.
This cuts electricity to the switch and helps prevent shocks. After switching it off, leave the panel door open as a reminder for yourself and others.
Double-check that you turned off the correct breaker by testing the switch for power once it’s off.
Using a Voltage Tester
Before you start any wiring, use a voltage tester to make sure the power is really off. Hold the tester’s probe to the wires in the switch box.
If it doesn’t light up or beep, the power is off and safe to touch. Voltage testers are simple to use and inexpensive.
Don’t skip this step even if the breaker is off. Sometimes wires can still carry power if the breaker isn’t labeled correctly or if power is coming from another source.
Gathering Required Safety Gear
You will need some basic safety gear to protect yourself. Always wear insulated gloves to avoid accidental shocks.
Safety goggles protect your eyes from dust and debris. Use tools with insulated handles like screwdrivers and wire strippers.
Keep a flashlight nearby in case of low light. Having everything ready before you start will keep the process smooth and safe.
Tools and Materials Needed
Before you start replacing your dimmer switch, make sure you have everything you need. This includes the right tools, the proper switch matching your circuit, and a few extra items.
Essential Tools for the Job
You will need a few basic tools to remove the old dimmer and install the new switch. Start with a screwdriver set—usually, a flathead and a Phillips.
A voltage tester is important to confirm the power is off before you touch any wiring. Other useful tools include wire strippers and needle-nose pliers.
If your switch box has tight space, a flashlight can help you see clearly.
Choosing the Right Regular Switch
Pick a regular single-pole switch that fits your fixture and is compatible with your home’s wiring. Normal switches come with ratings for current and voltage, usually listed on the box.
Look for a switch rated for 120 volts if you are in a typical U.S. home. If you have a three-way dimmer switch, replace it with a three-way regular switch.
Make sure the size fits your switch box. Most switches are standard size, but check to prevent problems during installation.
Other Helpful Supplies
Have some extra materials handy. Electrical tape helps secure wire connections and insulate exposed wire ends.
You might also need wire nuts to join wires safely. These come in different sizes; pick the right size for your wire thickness.
A small drop cloth or towel can protect the floor from dust and scraps. Keep a notepad and pen nearby to record wire positions if you want extra caution before disconnecting anything.
Removing the Old Dimmer Switch
Before you start, turn off the power to the switch at the breaker. You’ll carefully take off the switch plate, disconnect the wires, and handle everything safely to avoid shocks or damage.
Taking Off the Switch Plate
First, remove the screws holding the switch plate cover. Use a flathead or Phillips screwdriver depending on the screw type.
Be gentle when pulling the plate away from the wall to avoid cracking it or damaging the paint. Set the plate and screws aside in a safe spot.
Sometimes the plate might be painted over or stuck, so work slowly. Make sure no wires are visible or touched until power is confirmed off.
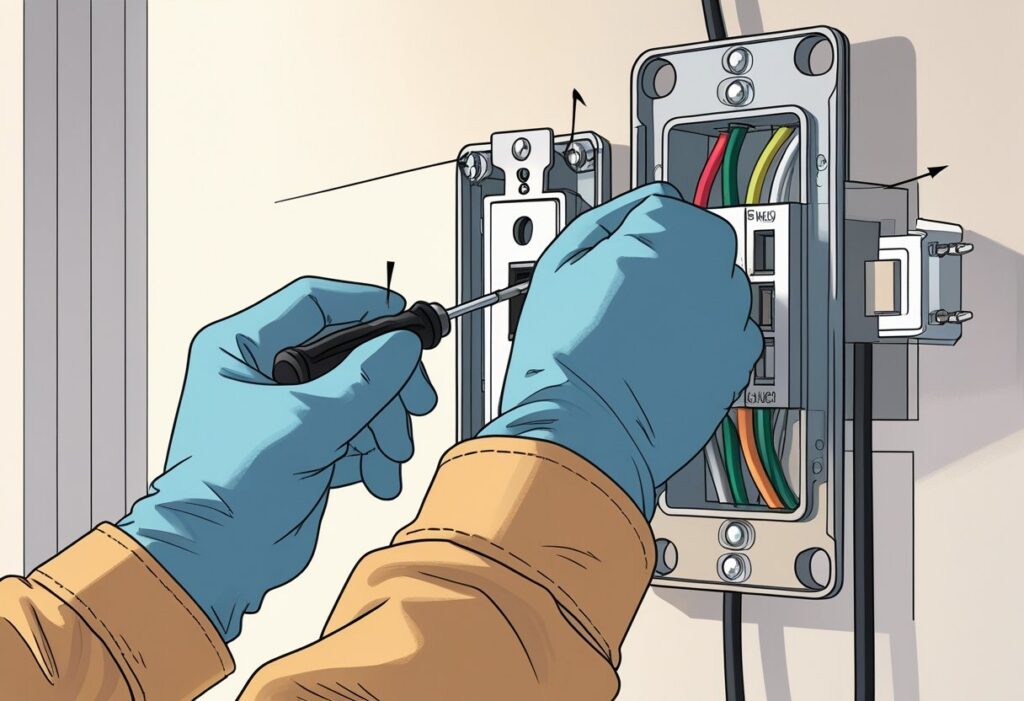
Disconnecting the Wires
Once the plate is off, you’ll see the dimmer switch attached to the electrical box by screws. Remove those screws next.
Carefully pull the switch out without pulling the wires. Notice how the wires connect—usually with wire nuts or screws.
Loosen the wire nuts or screws to free the wires. Keep track of where each wire goes if you want to use that info for reconnecting the new switch.
Handling Wires Safely
Double-check that power is off with a voltage tester before touching wires. Touch each wire gently with the tester to ensure no electricity is running.
When removing wire nuts, twist them off slowly to avoid jerking or damaging the wires. Keep the wires separated to prevent them from accidentally touching.
If wires are frayed or broken, trim and strip new wire ends before attaching the new switch. Proper wire length and clean ends help secure a safe connection.
Installing the Regular Switch
You will connect the wires from your wall to the new switch. Make sure each wire is attached properly.
Then, fasten the switch into the electrical box. Finally, put the switch plate back on to finish the installation.
Attaching the Wires to the New Switch
First, look at the wires coming from the wall. Usually, there are two or three wires: a black (hot), white (neutral), and sometimes a bare copper or green (ground).
Attach the black wire to the brass-colored screw on the new switch. If your old dimmer had more wires, note that a regular switch only needs the hot and possibly ground wire.
Connect the ground wire to the green screw on the switch. If your switch does not have this screw, attach the ground to the metal box if it is grounded.
Do not connect the white neutral wire to the switch. Instead, twist it together with other white wires in the box using a wire nut.
Make sure all screws are tightened well and no copper is exposed beyond the screw terminals.
Securing the Switch in the Electrical Box
After wiring, gently fold the wires back into the electrical box. Be careful not to pinch or pull any wires.
Position the switch so that the screw holes line up with the box holes. Use the screws provided to fasten the switch securely.
Check that the switch is straight and sits flush with the wall. Do not over-tighten the screws, as this could crack the switch or box.
Ensure the switch does not move when you try to wiggle it.
Reattaching the Switch Plate
Once the switch is secure, place the switch plate over it. Line up the plate holes with the screws on the switch body.
Use a screwdriver to tighten the screws holding the plate. Tighten just enough to hold the plate firm, but avoid cracking or bending the plate.
If the plate is old or damaged, consider replacing it for a clean, safe finish. After the plate is on, turn the power back on and test your switch.
Testing the New Switch
Once you have installed the new switch, restore power safely and make sure it works. This step helps you avoid electrical issues and confirms your installation.
Restoring Power to the Circuit
Before turning the power back on, double-check that all wires are properly connected. Make sure the switch is securely mounted and no exposed wires are touching anything.
After confirming everything is safe, go to your circuit breaker panel and switch the breaker back on. Avoid touching the switch or wiring while doing this.
If your breaker trips immediately, turn it off again and re-inspect your work. A tripped breaker could mean a wiring problem or a short circuit.
If it stays on, you can proceed to test the switch’s function.
Checking Proper Functionality
Flip the new switch on and off to see if the light responds. The light should turn on when the switch is flipped up and turn off when flipped down.
Check that the switch operates smoothly without any strange noises or flickering lights. Flickering may point to loose wiring, so if you see this, turn the power off and tighten connections.
Test the switch multiple times to make sure it consistently works. If your switch controls multiple lights or outlets, test each to ensure they all respond properly.
Troubleshooting Common Issues
Sometimes problems can come up when replacing a dimmer switch with a regular switch. Knowing how to fix common issues will help you get your lights working safely.
What to Do If the Switch Doesn’t Work
If your new switch doesn’t turn the lights on or off, check the power. Make sure the circuit breaker is on and the power is not off at the fuse box.
Next, turn off the power before checking the wiring. Loose or incorrect wiring can cause the switch to fail.
Look for loose wires, wires connected to the wrong terminals, or damaged wire insulation. If you see any problems, tighten connections or reconnect wires properly.
Using a voltage tester can help you confirm the power is off before touching anything. If the switch still doesn’t work after fixing wiring, the switch itself may be faulty.
Try replacing it with another new switch to see if that solves the problem.
Addressing Flickering Lights
Flickering lights after switching from a dimmer to a regular switch often happen because of bulb or wiring issues. First, check if your bulbs are tightly screwed into their sockets.
If the lights still flicker, look at the type of bulb you use. Some LED bulbs need specific switches or dimmers to work properly.
Using regular bulbs with a dimmer or using bulbs that don’t match the switch can cause flickering. Another possible cause is a loose wire connection in the switch or light fixture.
Turn off the power before you check for loose wires or damaged parts. If flickering continues, contact an electrician to check for bigger problems in your electrical system and prevent safety hazards.
Maintenance Tips for Light Switches
Check your light switches regularly for any signs of wear or damage. Look for cracks, loose parts, or flickering lights when you use the switch.
Keep the switch plate clean. Dust and dirt can build up and cause problems.
Use a dry cloth to wipe the surface gently. Avoid getting moisture inside the switch.
If a switch feels hot or makes unusual noises, turn off the power and get it checked. These can be signs of electrical issues that need attention.
When you clean or paint switch covers, never spray paint or apply liquids directly on the switches. Always remove the cover first and protect the electrical parts.
Here’s a quick checklist for maintaining your switches:
| Task | How Often | Tips |
|---|---|---|
| Visual Inspection | Every 6 months | Look for cracks, discoloration, or looseness |
| Cleaning | Monthly | Use a dry cloth; avoid liquids near switch |
| Test Functionality | As needed | Check if switch works smoothly without noise |
| Replace if Damaged | Immediately | Replace switches showing signs of wear |
Always turn off the power at the breaker before working with your switches. These simple steps help keep your switches safe and reliable.
When to Call a Licensed Electrician
If you are not sure how to turn off power safely, call a licensed electrician. Working with live wires can be dangerous and cause injury.
Get help if your wiring looks old, damaged, or confusing. An electrician can check if your electrical system is safe and up to code.
Signs you need a professional include:
- Flickering lights or dimming issues
- Switches that feel hot or make buzzing sounds
- Multiple fixtures or rooms losing power
If your switch controls complex systems like three-way or four-way setups, a pro can handle the wiring without mistakes. Errors can cause bigger problems or damage.
When you replace a dimmer switch with a regular one, an electrician can make sure everything connects properly. They have tools to test voltage and confirm the circuit is off before working.
If you need permits or inspections, an electrician can help you get those done. This keeps your home safe and legal.
When in doubt, hire a licensed electrician. They protect your family and home while making sure the work is done right.
Frequently Asked Questions
Replacing a dimmer switch with a regular switch involves turning off power, removing the dimmer, and connecting wires properly. Safety and knowing the wiring setup are important to get the job done correctly.
What are the steps to install a regular light switch where a dimmer used to be?
First, turn off the power at the circuit breaker. Remove the dimmer switch by unscrewing the cover and disconnecting the wires.
Connect the wires to the new switch using wire nuts. Screw in the new switch and replace the cover.
Can I replace a 3-way dimmer with a standard 3-way switch, and if so, how?
Yes, you can. Turn off the power, remove the 3-way dimmer, and note the wiring connections.
Connect the wires to the matching terminals on the new 3-way switch. Make sure you keep the traveler wires connected correctly.
Is it possible to change a double dimmer switch to a conventional switch, and what should I consider?
You can replace a double dimmer with two separate standard switches or a double switch if available. Check the wiring to make sure each switch controls the right light.
Pay attention to the wiring colors and connections because double dimmers may have extra wires.
How can I safely remove the knob and cover from an old dimmer switch before replacing it?
Turn off the power first. The knob usually pulls straight off or may have a small screw holding it.
Use a flathead screwdriver to gently pry off the cover plate after removing the knob.
What wiring changes are needed when replacing a dimmer switch with a non-dimming switch?
Most dimmers and regular switches use the same wiring setup. Connect the hot wire, load wire, and ground wire to the new switch.
If the dimmer had extra wires for special features, cap those off safely.
Is it complicated to swap out a dimmer switch for a regular switch, and do I need any special tools?
Swapping a dimmer switch for a regular switch is not very complicated if you know basic electrical safety.
You need a screwdriver, wire strippers, and possibly wire nuts.
Always double-check that you turned off the power before starting.