Wiring a 3-way switch can seem daunting at first, but it’s a manageable task that can enhance the convenience of your home’s lighting system. You can control a single light from two different locations, making it an ideal solution for larger spaces or multi-entry rooms.
At Magnify Electric, we understand the importance of functional and efficient lighting in both residential and commercial settings. Our licensed electricians can guide you through the wiring process, ensuring a safe and correct installation every time.
Whether you’re looking to change your lighting setup or install new fixtures, you can trust Magnify Electric for all your electrical needs. With our expertise, you’ll get comprehensive support from start to finish, making your project a success.
Understanding 3-Way Switches
3-way switches allow you to control a light fixture from two different locations. This functionality is especially useful in larger rooms, hallways, or staircases, enhancing both convenience and safety.
What Is a 3-Way Switch
A 3-way switch is a special type of electrical switch that has three terminals. Unlike a standard single-pole switch, which has two terminals, a 3-way switch connects your electrical circuit in a way that permits power control from two different points. Common applications include multiple entrances to a room or transitions such as staircases.
How 3-Way Switches Work
To understand how 3-way switches operate, consider the wiring setup. Each switch has two traveler terminals and one common terminal. When you toggle one switch, it changes the connection between the traveler wires. This alters the electrical path, allowing power to flow to the light fixture from either switch.
This system ensures that you can turn your lights on or off no matter which switch you use. With a basic understanding of this mechanism, you will find DIY installations more accessible.
Difference Between 3-Way and Single-Pole Switches
The primary difference between a 3-way switch and a single-pole switch lies in their functionality. A single-pole switch controls a light fixture from one location, making it simpler in design and installation. In contrast, the 3-way switch provides flexibility by allowing control from two separate points.
For example, if you want to operate lights from both ends of a long hallway, the 3-way switch is essential. Choosing the right switch depends on your specific needs in your home or business space. Magnify Electric specializes in both residential and commercial electrical work, ensuring you select the best solutions for your projects.
Key Components and Tools Needed
When wiring a 3-way switch, having the right components and tools is essential for a successful installation. Understanding the materials involved and using appropriate tools helps ensure safety and functionality.
Wires and Cables Used in 3-Way Switch Wiring
In a 3-way switch setup, you’ll primarily use NM cable, which is commonly known as non-metallic sheathed cable. The typical configuration includes three types of wires: hot wire, neutral wire, and ground wire.
- Hot Wire: This wire carries current from the power source to the switches.
- Neutral Wire: This connects back to the service panel and completes the circuit.
- Ground Wire: Essential for safety, this wire directs any fault current away from electrical components.
Additionally, traveler wires connect the two switches, allowing control from multiple locations. You’ll also find the common wire, which connects to the light fixture. Ensure you choose the right gauge, usually 12 or 14-gauge, to prevent overheating.
Essential Tools for Safe Installation
Before starting your project, gather the necessary tools to ensure safety and efficiency. Key tools include:
- Voltage Tester: A non-contact voltage tester helps confirm that wires are not live before you begin work.
- Utility Knife: Useful for stripping insulation from wires.
- Screwdriver: Necessary for securing connections and mounting switches.
You should also have wire nuts for connecting wire ends securely and electrical tape to insulate any exposed wiring. Using these tools not only streamlines the process but also minimizes the risk of electrical hazards.
Understanding Switch and Electrical Boxes
Proper installation requires knowledge of the various boxes in which your switches will reside. The switch box houses the switch itself, while the electrical box is used for connections and circuit protection.
When installing, ensure that the box is rated for the load and securely mounted. The light fixture box must be strong enough to support the weight of the fixture.
Make sure to connect the ground screw in each box for safety. This ground terminal should link to the ground wire for added protection. For any electrical needs, our team at Magnify Electric offers expertise in residential and commercial work to assist you with installations.
Wiring Methods and Diagrams
Understanding the various wiring methods and diagrams for 3-way switches is crucial for effective installation. Different techniques and wiring configurations can impact how your switches operate, making it essential to choose the right method for your setup.
Traveler Terminal Method
The traveler terminal method involves using two switches to control a single light from different locations. Each switch has three terminals: a common, a traveler, and a ground.
- Common Terminal: This terminal is where the power source connects.
- Traveler Terminals: These are used to connect the two switches, allowing the circuit to alternate the on/off state of the light.
Typically, you connect wires from the common terminal of switch #1 to the light fixture and from the traveler terminals of both switches to each other. This setup allows you to efficiently control the light from multiple points.
Power at Switch vs. Power at Light
Deciding whether to run power to the switch or the light first significantly affects the wiring process. Here’s a breakdown of each method:
- Power at Switch: Power comes directly to switch #1. This requires connecting the common terminal to the power, while the second switch acts as a traveler to the light. It simplifies wiring but may need more space in the switch box.
- Power at Light: Power flows to the light fixture first. In this case, wires travel from the fixture back to switch #1. You’ll connect the common terminal of switch #1 to the light source, making this method a bit more complex but often resulting in a cleaner look.
Both methods have their advantages, and choosing the right one depends on your specific installation scenario.
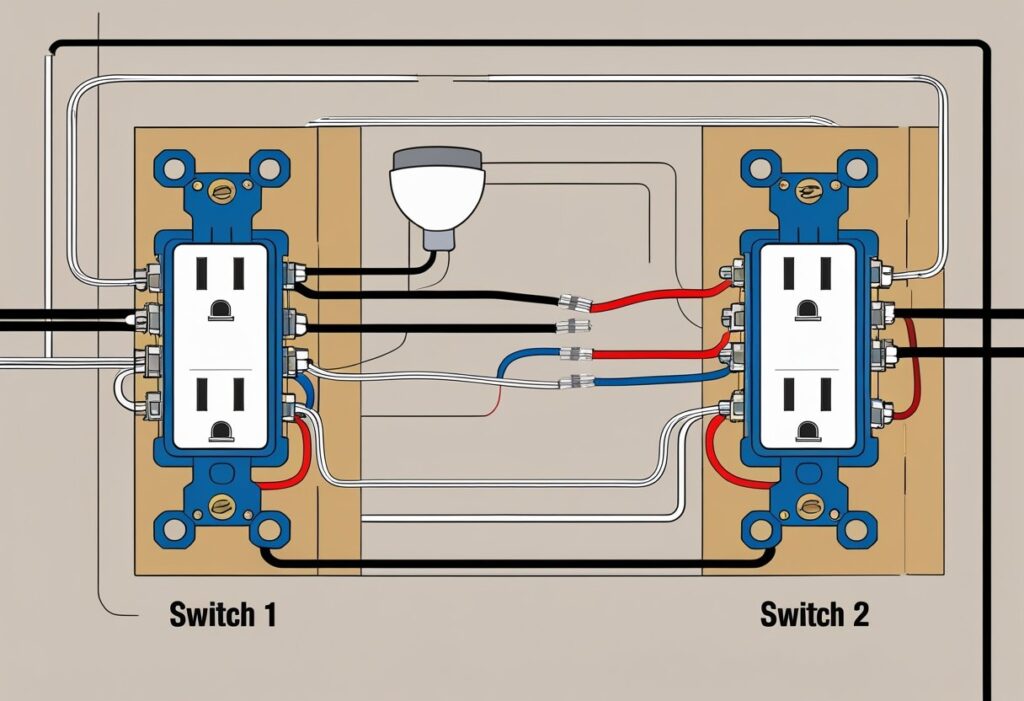
3-Way Switch Wiring Diagram Overviews
Creating a clear wiring diagram can facilitate the installation of your 3-way switches. Here are key components to include in your diagrams:
- Switch #1 and Switch #2: Clearly label each switch.
- Traveler Wires: Show connections between traveler terminals on both switches.
- Light Fixture: Include the light being controlled and how it ties into the switches.
Diagrams can be created using simple drawings or downloaded from reliable sources that offer 3-way switch wiring diagrams. These visual guides can greatly enhance your understanding and make the process smoother.
Pigtailing and Secure Connections
Pigtailing refers to the technique of joining multiple wires together, ensuring secure and reliable connections in your 3-way switch setup. This method is particularly useful when you need to connect wires from different circuits or multiple switches.
- Steps:
- Strip about ¾ inch of insulation from the ends of the wires.
- Twist the ends of the wires together, using pliers for a strong grip.
- Secure them with a wire nut to prevent any accidental disconnection.
Ensuring that all connections are tight and well-insulated minimizes risk. When you need expert help with your electrical projects, trust Magnify Electric. Our licensed electricians excel in handling all types of residential and commercial electrical work. Whether it’s adding outlets or upgrading fixtures, we’ve got you covered.
Step-by-Step Guide: How to Wire a 3-Way Switch
Wiring a 3-way switch allows you to control a single light or fixture from two different locations. This guide will walk you through the necessary steps to complete the wiring safely and efficiently.
Switch Off Power and Confirm Circuits
Before beginning any electrical work, turn off the power at the circuit breaker. Locate the breaker for the circuit you will be working on and switch it off. This ensures your safety while handling the wires.
Next, use a non-contact voltage tester to confirm that the power is indeed off. Test both switches and the light fixture to ensure no electricity is flowing. Safety must always be your priority, so consider wearing insulating gloves and goggles during installation.
Wiring the First Switch
Once you have confirmed that the power is off, start by wiring the first switch. You will typically have three wires: one common (black) and two traveler wires (red and black).
Attach the common wire from the power source to the common terminal on the switch. The traveler wires connect to the two remaining terminals on the switch. It’s essential to ensure that you are using the correct terminals, as incorrect connections can lead to issues.
If you are unsure about the wiring or the setup, consulting a licensed electrician, like those at Magnify Electric, can be beneficial. Our experts can ensure that everything is up to code and working properly.
Connecting the Second Switch
Move on to the second switch in your setup. This switch follows a similar wiring process. Start by connecting the traveler wires that were connected to the first switch.
The common terminal of the second switch should be wired to the light fixture, ensuring a seamless connection. Double-check all wire connections, making sure they are secure and properly attached. Loose wires can create hazardous conditions or prevent the switch from functioning properly.
If complications arise, we recommend reaching out to Magnify Electric for assistance. Our licensed electricians can tackle any issues and guarantee a safe setup.
Finalizing Connections and Testing
After connecting both switches, your next step is to finalize the electrical connections. Ensure that all wire nuts are securely fastened and that excess wire is neatly organized within the electrical boxes.
Once everything is in place, restore power at the breaker. It’s now time to test the switches. Turn on the first switch and check to see if the light operates as intended. After testing, switch off and then use the second switch to confirm successful operation from both locations.
If the light does not work, revisit your connections or consult a licensed electrician for help. Our team at Magnify Electric is committed to assisting you with all your electrical needs, ensuring everything works correctly and safely.
Common Challenges and Troubleshooting
Wiring a 3-way switch can present several challenges that require careful troubleshooting. Understanding the components and common issues will help you ensure a successful installation and reliable function.
Identifying Wires and Terminals
In a typical 3-way switch setup, you will encounter three types of wires: hot wire, neutral wire, and common wire.
- Hot Wire: Usually black, it connects to the power source.
- Neutral Wire: Typically white, it completes the circuit by connecting back to the electrical panel.
- Common Wire: This wires connects to the switch and carries current to the light fixture or to another switch.
The two remaining wires are the traveler wires, often red and black, connecting the two switches. Ensure you correctly identify each wire and terminal to avoid malfunction.
Fixing Common Wiring Mistakes
Incorrectly connecting wires is a common error in installing 3-way switches. Here are key mistakes to watch for:
- Misconnecting Traveler Wires: Ensure that the traveler wires are connected to the correct terminals, often indicated by matching colors or markings.
- Neglecting the Common Terminals: One switch must have its common wire connected to the power source, while the other connects to the load (light fixture).
- Ignoring Ground Wires: Always connect ground wires (usually green or bare) to the switch’s grounding terminal.
If you encounter issues, double-check your wiring against a standard wiring diagram. At Magnify Electric, our licensed electricians can assist with accurate installation and resolve these challenges.
Testing and Verifying Functionality
After wiring, it’s essential to test your installation. Here’s how you can verify everything works correctly:
- Turn Off Power: Switch off the circuit breaker to avoid shock.
- Check Connections: Make sure all wires are secure at their terminals.
- Test the Switches: Turn the power back on and toggle the switches. The light should turn on and off from both locations.
Utilize a multimeter to check for continuity in the circuit. If the light does not work, recheck each connection for correct wiring. Magnify Electric is here for your residential and commercial electrical needs, offering expert troubleshooting in case of persistent issues.
Safety Tips and Electrical Code Considerations
When wiring a 3-way switch, it’s essential to follow safety guidelines and adhere to electrical codes to ensure a safe and effective installation. Understanding the relevant codes, using appropriate materials, and knowing when to seek professional help are critical factors.
National Electrical Code Guidelines
The National Electrical Code (NEC) outlines safety standards for electrical installations. Adhering to these guidelines is paramount to ensure compliance and safety.
You must ensure proper labeling of wires and circuits in accordance with NEC requirements. Use a breaker that matches the load and is accessible.
Additionally, the NEC mandates that switch boxes have proper cover plates and secure mounting. Installing with these guidelines not only promotes safety but also prevents potential legal issues.
Proper Use of Materials and Tools
Selecting the right materials and tools is crucial for a successful installation. Use insulated cables, appropriate wire nuts, and electrical tape to secure connections.
Wire nuts should match the gauge of the wiring to ensure a secure fit. Always use high-quality electrical tape to prevent any exposed connections from causing short circuits.
Ensure your tools are in good working condition. A wire stripper and screwdriver specifically designed for electrical work will help you avoid mistakes during the installation.
When to Call a Licensed Electrician
While many DIY enthusiasts can handle simple electrical tasks, some situations require professional assistance. If at any point you feel uncertain, it’s wise to consult a licensed electrician.
Complex installations or repairs, like multiple switches or complicated wiring, are best left to experts. At Magnify Electric, our team of skilled professionals can assist with all electrical tasks, from basic lighting changes to new electrical fixtures.
Always remember, a licensed electrician ensures that your work is compliant with local codes and safety standards, reducing the risk of hazards in your home or business.
Frequently Asked Questions
Wiring a three-way switch can raise several questions. Below are answers to some common inquiries regarding the correct wiring configurations, diagrams, and installation steps associated with 3-way switches.
What is the correct wiring configuration for a 3-way switch with 3 wires?
The standard configuration for a three-way switch involves three wires: a common wire, and two traveler wires. The common wire connects to the power source and is typically black. The two traveler wires are often red and black, connecting the two switches, allowing for control of the light from both locations.
Can you provide a wiring diagram for a three-way switch?
A wiring diagram for a three-way switch will show the connections among the switches and the light fixture. It typically illustrates the common terminal, traveler wires, and the power source connection. You can refer to various resources online for detailed wiring diagrams tailored to different setups.
Where do I find a 3-way switch wiring diagram in PDF format?
You can find a 3-way switch wiring diagram in PDF format through several online electrical resources and home improvement websites. These diagrams can provide a clear visual representation to help you understand the wiring process easily.
How do you wire a four-wire 3-way switch?
Wiring a four-wire 3-way switch generally involves two traveler wires, a common lead, and a ground wire. One switch connects to the power source and sends the current through the travelers to the second switch. Ensure all connections are secure and match the corresponding color codes for accuracy.
What are the steps to install a Leviton 3-way switch?
To install a Leviton 3-way switch, follow these steps:
- Turn off the power at the circuit breaker.
- Remove the old switch and take note of the wiring.
- Connect the common wire to the common terminal on the new switch.
- Attach the traveler wires to their respective terminals.
- Ground the switch and secure everything back in place.
How do you wire a 3-way switch when you have 2 wires?
When you have only two wires for a 3-way switch, one will typically be the common wire and the other a traveler. In this case, connect the common wire to the common terminal and the traveler wire to either of the traveler terminals, allowing it to function as a basic 3-way switch.
For any electrical work, consider contacting Magnify Electric. Our team of licensed electricians is here to assist with residential and commercial electrical needs, whether it involves lighting changes or additional fixtures.