When working on electrical projects, understanding how to properly handle ceiling junction box wiring is essential for safety and functionality. This knowledge ensures that your ceiling lights and fixtures operate correctly, providing the illumination you need while minimizing fire risks. Proper installation involves knowing how to connect wires safely, identify load requirements, and follow local building codes.
At Magnify Electric, our team of licensed electricians can assist you with all aspects of electrical work, whether it’s simple wiring for a new light fixture or more complex installations. You can trust us to deliver high-quality service tailored to your residential or commercial needs. With our expertise, you’ll have peace of mind that your electrical installations are compliant and safe.
By understanding the fundamentals of ceiling junction box wiring, you empower yourself to make informed decisions about your lighting needs. With the right guidance from professionals like Magnify Electric, you can enhance both the safety and aesthetics of your space.
Understanding Ceiling Junction Box Wiring
Ceiling junction box wiring is crucial for safely connecting electrical fixtures. This section covers the essential aspects of ceiling junction boxes, including their definition, types, and the relevant electrical standards.
What Is a Ceiling Junction Box?
A ceiling junction box is an electrical box designed specifically for use in ceilings to house electrical connections. These boxes serve as a junction point for wires, allowing for safe connections between various fixtures such as lights and fans.
The primary function of a junction box is to protect electrical connections from physical damage and to contain any sparks or heat generated. This is essential for fire safety and compliance with the National Electrical Code (NEC).
Choosing the right junction box for your project is vital for ensuring compliance with local regulations and for maintaining safety in your electrical installations.
Different Types of Ceiling Junction Boxes
There are several types of ceiling junction boxes, each suited for specific applications. The main types include:
- Standard Junction Boxes: Used for general applications, holding wiring connections and fixtures. These are often mounted on ceiling joists.
- Old Work Junction Boxes: Designed for retrofitting into existing ceilings without needing access from above. They usually have brackets for secure mounting.
- Fan-rated Junction Boxes: Specifically built to support ceiling fans, these boxes must meet specific weight and installation requirements.
- Weatherproof Junction Boxes: Used for outdoor installations, these boxes offer additional protection against moisture and adverse weather conditions.
Selecting the correct type ensures that your electrical work is both functional and compliant.
Key Electrical Standards and Codes
Understanding the electrical standards and codes is essential for safe wiring practices. The National Electrical Code (NEC) outlines critical guidelines for the installation and use of junction boxes.
Some key requirements include:
- Junction boxes must be easily accessible for maintenance.
- Each box must be large enough to accommodate the wires it houses without overcrowding, reducing the risk of overheating.
Failing to comply with these codes can lead to hazardous situations, making it vital to follow local regulations closely.
At Magnify Electric, our licensed electricians are equipped to assist with your electrical needs. Whether you are updating your home’s lighting or installing new fixtures, our team is here to ensure your project meets all safety standards and codes.
Essential Tools, Materials, and Safety Considerations
When wiring a ceiling junction box, having the right tools and materials is crucial for a safe and successful installation. Additionally, adhering to safety best practices can prevent accidents and electrical problems in the future.
Required Tools for Installation
To begin, gather essential tools for the installation process. You will need:
- Stud Finder: Helps locate wooden beams behind the drywall for secure mounting.
- Wire Strippers: Necessary for removing insulation from the wires.
- Circuit Tester: Confirms power is off before working on electrical connections.
- Drill: For making holes and securing the junction box.
- Screwdrivers: Needed for fastening the box to the ceiling.
These tools will enhance your efficiency and safety during the installation process. A tool kit containing these items will keep everything organized and accessible while you work.
Choosing the Right Materials
Selecting appropriate materials is another crucial step. Look for a corrosion-resistant junction box, as it will improve durability and prevent rust. Opt for boxes made of materials like stainless steel or plastic with high ingress protection ratings.
Ensure that the junction box you choose is suitable for the environment and complies with local electrical codes. Additionally, using the correct gauge wire for your specific installation is vital for handling high voltage without risk of overheating or fire hazards.
Preparation and Safety Best Practices
Before starting, turn off the main power supply to avoid electrical fire risks. Confirm power is off using a circuit tester.
Prepare your workspace by ensuring it is dry and free from any clutter. Always wear rubber-soled shoes and safety glasses for added protection.
Properly secure the junction box with screws, ensuring it is stable against vibrations and movement. Following these preparation steps can significantly minimize risks, enhancing your safety and the effectiveness of your wiring project.
For expert assistance in electrical work, consider Magnify Electric. Our licensed electricians are equipped to handle all your residential and commercial electrical needs, ensuring safe and reliable installations.
Step-by-Step Installation of a Ceiling Junction Box
Installing a ceiling junction box requires careful planning and execution to ensure safety and compliance with electrical standards. The process involves selecting the right location, knowing the mounting methods suitable for your space, and securing the box properly to the ceiling joists.
Planning the Installation Location
Start by choosing an ideal location for the junction box, keeping in mind the purpose of your electrical installation. Ensure it’s easily accessible and away from any obstacles.
Consider the alignment with ceiling joists, as boxes need to be securely fastened. It’s beneficial to use a stud finder to identify the joists’ positions. Mark the desired installation point on the ceiling, ensuring it meets local code requirements. Environmental factors, such as exposure to moisture, may also influence the location choice.
Mounting Methods: New Construction vs. Old Work
When you’re working with new construction, you have the advantage of planning from the start. Use adjustable hanger bars to attach your junction box between joists. This allows for greater flexibility in positioning. Secure the box at a height that aligns with your fixture needs.
For old work, installing a junction box may require special considerations. You will often use a remodeling box designed to clutch onto the drywall. This box typically contains wings that expand when tightened to secure its position without the need for joists. This method is ideal for retrofitting older spaces.
Securing the Junction Box to Ceiling Joists
Properly securing the junction box is crucial for the safety of your electrical installation. If mounting to joists, use screws to attach the box firmly. Ensure it’s flush with the ceiling surface for a clean finish and to prevent stress on the electrical connections.
If you’re using a remodeling box, check that the wings are fully expanded and gripping the drywall effectively. This ensures stability and prevents any movement that could disrupt wiring.
Magnify Electric is here to ensure your installation is safe and efficient. Our licensed electricians provide expert guidance for all your electrical needs, from ceiling fixture installations to complete residential and commercial work.
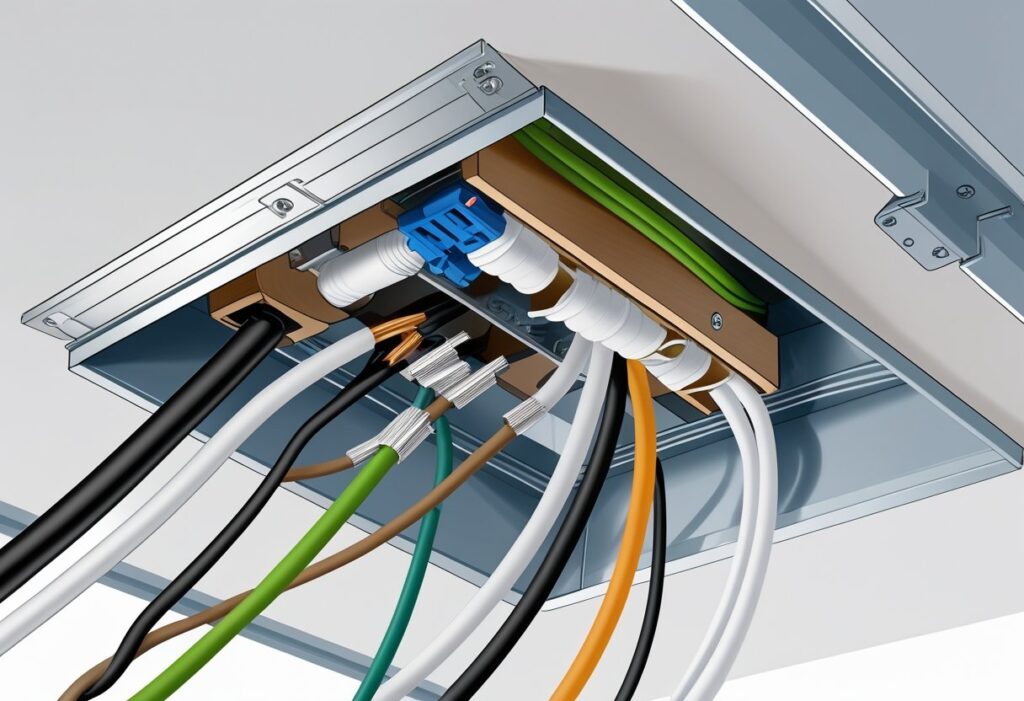
Ceiling Junction Box Wiring Techniques
Understanding various techniques for ceiling junction box wiring is crucial for both safety and functionality. Effective routing of electrical conductors and proper connections ensure a reliable electrical system.
Routing and Connecting Electrical Conductors
Begin by planning the path for your electrical conductors. Use insulated cables rated for the appropriate voltage and amperage.
When routing, avoid sharp bends that could damage the insulation. Maintain a minimum of 12 inches from water sources and ensure conductors are protected from physical damage.
Secure the wires using staples or clamps, ensuring they do not exceed the box fill limits. Each junction box has specific volume requirements determined by the National Electrical Code (NEC). Proper routing minimizes the risk of interference and electrical faults.
Wire Connections: Nuts, Ground Wires, and Safety
When connecting wires in a junction box, utilize wire nuts for secure connections. Make sure to strip the insulation off the wire ends adequately, typically about ¾ inch.
Twist the wires together with a pliers before securing with the wire nut. It’s vital to include ground wires in your connections for safety.
Each wire must be properly grounded to prevent electrical shock. Follow local codes and standards for grounding practices, ensuring your electrical system is safe and compliant. Remember, safety is paramount during installation.
Managing Box Fill and NEC 314.16 Compliance
Adhere to NEC 314.16 to manage box fill effectively. The code specifies how much space is required for each conductor and device in a box.
As a rule of thumb:
- Each conductor counts as one unit.
- Add one unit for each switch or device.
- Ground wires are not counted in this calculation.
Ensure your junction box has sufficient volume to accommodate all wires and connections. Overfilled boxes can lead to overheating and potential fire hazards.
Making Reliable Electrical Connections
Reliable connections enhance system performance and safety. Start by selecting high-quality electrical connectors suited for the environment.
When using wire nuts, ensure a tight fit to prevent loosening over time. If applicable, use terminal blocks for a more permanent connection.
Regularly check connections for corrosion or wear, especially in high-humidity areas. Magnify Electric offers expert assistance in these areas, ensuring your connections are secure and up to standard.
Trust our licensed electricians for all your residential and commercial electrical needs, from minor adjustments to complex wiring projects.
Integration with Other Electrical Components
Integrating a ceiling junction box with other electrical components is essential for a reliable electrical system. Understanding how to connect switches, outlets, and fixtures ensures safety and functionality in your home or office.
Connecting Switches and Electrical Outlets
When connecting a junction box to switches and outlets, ensure all power is off to prevent electric shocks. Use appropriate wire gauges to match the circuit’s amperage.
- Wiring the Switch: Connect the line wire (typically black) to the switch. The load wire should run from the switch to the junction box.
- Wiring the Outlet: For outlets, connect the black wire to the brass terminal and the white wire to the silver terminal. Ground wires should connect to the green terminal.
Always verify that all connections are secure. Working with experienced professionals like Magnify Electric can ease this process, ensuring your system is compliant and safe.
Installing Ceiling Lights and Fixtures
Installing lights involves careful handling of wires and components. Start by securely mounting the ceiling junction box to support the fixture’s weight.
- Wiring the Fixture: Connect the fixture wires to the corresponding wires in the junction box. Typically, black is for hot, white is for neutral, and green or bare is for ground.
- Securing Connections: Use locknuts to secure wire connections and prevent them from coming loose. Ensure all wire nuts are tightly fastened.
If you need help with installations, Magnify Electric can assist you in making sure all electrical work is performed correctly and safely, giving you peace of mind.
Using Conduits, Fish Tape, and Locknuts
Conduits protect electrical wiring while providing a clean installation. Use them when running wires through walls or ceilings, especially in areas prone to moisture.
- Fish Tape: This tool is crucial for guiding wires through conduits. Insert fish tape into the conduit, attach the wire, and pull it through smoothly.
- Locknuts: These fasteners keep the conduits in place and secure the junction box, ensuring it feels stable and reliable.
For complex electrical projects, consider working with a licensed electrician to streamline the integration of these components in your system. Their expertise helps to avoid common pitfalls and ensures your wiring is safe and efficient.
Frequently Asked Questions
Understanding how to work with ceiling junction boxes can help streamline your electrical projects. Here are common questions and their answers to assist you further.
How do you install a ceiling light junction box?
To install a ceiling light junction box, start by turning off the power at the circuit breaker. Use a voltage tester to confirm the power is off. Cut an opening in the ceiling if it’s a new installation, or remove the old fixture and disconnect the wires from the existing box.
Position the new junction box inside the ceiling, securing it to a support brace if necessary. Connect the wires according to their colors—black to black, white to white, and the ground wire to the ground screw. Finally, mount the light fixture to the junction box and restore power.
What are the steps to install an electrical box in a ceiling without access?
Begin by turning off the power. Use a stud finder to locate a safe area for the box. Cut an opening in the ceiling for the electrical box. If you lack access, use an old work box designed for installation without direct access to the ceiling joists.
Feed the wire through the opening. Secure the box according to the manufacturer’s instructions. Connect the wires and ensure everything is correctly fastened before restoring power.
Can you install a junction box in a ceiling without studs?
Yes, you can install a junction box in a ceiling without studs. Use an old work junction box that clamps to the drywall. These boxes can anchor themselves directly to the drywall, allowing for secure installation without needing to attach to a stud.
Ensure the box is rated for the weight of the fixture you intend to install. Follow all manufacturer guidelines to maintain safety.
What are the guidelines for choosing and installing an old work ceiling box?
When selecting an old work ceiling box, ensure it is rated for the intended load. Choose a box that can accommodate the wires you plan to use. Installation involves confirming the box fits the cut-out and is secured to the drywall.
Use screws provided to clamp the box tightly against the drywall. This helps prevent sagging or shifting once weight is added.
What is the maximum number of 12 gauge wires that can fit in a single junction box?
The National Electrical Code (NEC) provides guidelines for wire filling in junction boxes. For a standard junction box, a maximum of 9 solid 12 gauge wires can fit. However, this number may vary based on the size of your junction box.
Always refer to local codes and regulations for specifics pertaining to your situation.
How should the red wire be connected in a ceiling junction box?
The red wire is often used as a second hot wire in circuits, typically for three-way switches. In a ceiling junction box, connect the red wire as specified in your fixture instructions or wiring diagram.
If it’s not being used, cap it with a wire nut and tuck it safely inside the junction box. Ensure all connections are secure and follow local electrical codes.
For complex wiring needs, consider reaching out to a professional. Magnify Electric offers expertise in both residential and commercial electrical work. Our licensed electricians are ready to assist you with lighting installations or any electrical upgrades you require.